Showing posts with label DIY. Show all posts

Tuesday, December 9, 2014

Disappearing Gifts


Doesn't sound too appealing, does it? But hear me out.

I actually had this idea while watching Barefoot Contessa (because I have a dream that I'll someday be Ina Garten). She simply pointed out that sometimes it's difficult to buy for people who have everything (read: money) so the best gifts are disappearing ones.

What is a disappearing gift, you ask? Well, by Ina's definition, it is a gift that is used up in one sitting. Examples: movie or theater tickets, Groupons, baked goods, wine, activities - anything that is used promptly, and disappears. I love this concept because, let's face it, Christmas shopping can get really expensive. But these disappearing gifts can seem even more thoughful (and can help to avoid amassing mountains of cheap crap in your home). Clutterbugs be gone! Especially under tight budget constraints, I think that this idea works wonders, since it can be adapted in so many different ways.

As a college student, when money was obviously tight, I often made my parents a gift basket of wine and snacks and sweets that they couldn't buy where they live. It was a simple, thoughtful gift that took into consideration their love of food and wine, and my advantage of living in a big city (Thank you, Trader Joe's). My grandmother often baked enormous batches of her famous cookies, and gave each family member a tin. A favorite aunt makes homemade Bailey's and distributes mason jars to family members each year (which I will sorely miss now that I am 3000 miles away! Save me some if you're reading this!)

Anyone trying out disappearing gifts this year, or have any recommendations, post in the comments below!!

All images found on Pinterest

Thursday, October 23, 2014

Paper


It's a well-known tradition to give anniversary gifts based on an annual theme. Not many people adhere to it, but I think that it's a fun inspiration. One's mind immediately jumps to all of the opportunities that this year's theme allows: plane tickets, cash, etc. Mind you, if I could think of a really great gift that didn't fit in the theme, I'd go with it. But this year, and because of financial restrictions when it comes to gift-buying, I've made a homemade anniversary gift in keeping with the one-year theme: paper.

For those of you who don't know Steve and my story, here is a [slightly] abridged version:
I was studying abroad in London when I was 20, and Steve and I met through a mutual friend.
He fell in love with me at first sight, so he says, but I blame the leather leggings I was wearing and the fact that I'm pretty sure I danced on a table at some point during the evening we met.
Classy girl, aren't I? Well, he kept coming around to see me, so he must be telling the truth.

After I left London, we kept in touch via Skype for a few months, almost a year maybe. But as things do, our contact fizzled out.

{Time Lapse}

April, 2013 - I was going on a 9-day vacation in Ireland, beginning and ending in Dublin. Steve happened to be on Facebook the day I arrived, and saw a photo of me drinking a pint of Guiness. He commented on the photo, saying that the only appropriate place to drink Guiness is in Ireland. Well, I said, I was.

I went about the next week traveling around the pretty Irish countryside, and returned in Dublin on day 8 of our trip. Walked into the hotel, and while my mom checked in, headed to the bar (as one does). And do you know who was sitting there? Yep. Steve.

I ditched my family, and tour group companions, and the two of us spent the rest of the day pub crawling through the Temple Bar area. I don't think I stopped smiling, or laughing, for a second. Somewhere between pubs, while walking down the street, I blurted out, "doyouwannagetmarried" in some sort of silly, slurred speech. Well, to this day, that counts as my proposal. Yep. I proposed. But he did bolt into a church at the end of the street, mid-sermon, and demand that we get married on the spot. After that, I think he asked our taxi cab driver to perform the ceremony. It all got a little blurry, but the proposal stuck.

There was a really romatic horseback ride through the mountains the next day, but that's part of the longer version. You'll have to buy the book, for that.

I returned to NYC two days later, back to my "normal" life, but it wasn't going to be normal for long. Steve started the visa process to come to the states, and I had to kick my then-roommate out (sorry, Greg) and start preparing for Steve's arrival. My friends and family all thought we were nuts. Well, we are. But it suits us.

He arrived in late August. I remember standing at "arrivals" in JFK, thinking he wasn't going to walk down that ramp. I thought it couldn't be real.
But it was. And on October 18th, 2013, we tied the knot at City Hall in New York. You can read more about our fun day here.

So since our story crosses space AND time, I made a little gift in keeping with that, as well as the first-year theme of paper. It's all of the important places in our relationship: where we first met, where I proposed, and where we tied the knot. There are little hearts stitched over the exact geographical location on the map where all three of these events took place. So, I think I did a pretty good job with paper. What do you think?


Tuesday, October 14, 2014

3 Unexpected Uses for Coconut Oil


I'm a big fan of coconut oil - and really, who isn't these days? From cooking to skincare, it's the best all-around item to keep in every room in the house. Here are a few of my favorite non-conventional uses for uber versatile coconut oil:

1. Leather Conditioner
It's great for skincare, so why not leather? After all, leather was skin at one point, too. A pea-sized dab of coconut oil can give a quick condition & shine to those winter boots and leather shoes. I just buff it in with a cloth or tissue, and voila! 

And speaking of shine...

2. Furniture Polish
Nothing beats that freshly-shined look of wood furniture in your home, but sometimes I worry about all of the chemicals in an aerosol can of furniture polish. I mean, it looks nice,  but at what cost?
Mixing a few drops of your orange or lemon essential oil into coconut oil can make for a great furniture polish - and a little bit goes a long way here. Plus, you get that fresh citrus-y clean smell without any of the harmful additives. It's a win-win!

3. Sticker Remover
Nothing is worse than those little price stickers that leave behind a gummy residue when peeled off. There are some expensive goo removal products in stores, but again, why use all of those chemicals? Rubbing a little coconut oil onto the sticky part, and then rubbing with a cloth or paper towel, should remove whatever a sticker may have left behind. It might take a little extra elbow grease, but you also don't have to worry about an abrasive solution damaging whatever it is you're removing the sticker from.

Have more ideas for coconut oil uses? Let me know in the comments!

Friday, September 12, 2014

Adventures in: Bread Making


This post comes from my food blog, Street Cred!

I am not a baker; I absolutely hate math and all things to do with precise measurement. Most of my cooking style, and my recipes, involve a list of ingredients without quantities or instructions. Why? Because I just sort of "wing it"; nothing is ever the same twice (except my tomato sauce, but that's a closely guarded secret). I think it's important to cook based on taste, because ingredients can vary in freshness, intensity, and often need to be adjusted to perfect the overall balance. But with that rant aside, I'll get back to my story about bread, and how I actually followed a recipe for once.

Nothing quite excites me like a good rustic crusty loaf of REAL bread. My eyes light up in an Italian restaurant every time a basket full of hot-out-of-the-oven goodness plops down on the table in front of me. When I don't feel like cooking, I'll pick up a fresh baguette on the way home and just dip it in some good olive oil, or spread some nice soft bleu cheese on it while it's warm. Ah, the wonders of good bread.

I've seen countless recipes of the "no-knead Dutch oven" variety floating around the internets lately, but upon further investigation, these look like they come out resembling a dense white bread, which is not what I am looking for. No, I want hard-crusted oblong and round loaves with a fluffy, bubbly interior. And I want to make it myself.

So, without further delay, I present to you my first attempt at homemade crusty bread. And I double-pinkie-promise that it's easy and idiot-proof. I mean, I baked something. That's proof enough.

You will need: 
Patience (Start to finish, this recipe takes about 4 hours)
3 1/2 cups bread flour (may be labeled as "strong flour") + extra for kneading/dusting
1 tsp dry instant yeast
2 tsp fine sea salt
1 1/4 - 1 1/2 cups warm water (Tap water is fine, it should be "bath water" temperature. Not too hot!)
1 baking sheet OR pizza stone
1 metal or glass pan with 1" sides
1 large mixing bowl
Your hands


The Dough:
Mix the flour, dry yeast, and salt in a bowl.
Slowly add the warm water, stirring constantly (I used a regular spoon to mix, but this can also be done in a stand mixer with a bread hook. I have none, so I did it the old fashioned way.)
When the dough is "sticky" (should look like the photo above), stop adding water, dust the top with flour, cover with a tea towel and let sit.

Let it rise for two hours. Leave it alone. Go do something else.


Dividing the Dough:
Divide the gooey dough into 3 balls. To do this, dust some flour on your countertop or wooden cutting/baking board, and roll the balls in it so that they're less sticky. Cover again, and let rest for 15 minutes.


Kneading the Dough:
A lot of people think that this is the hardest stage. Well, it's not. This isn't pasta, so the kneading part isn't the most difficult. Actually, the difficult part is done (for me, that was the waiting).
Take each ball and knead 5-8 times. Basically, roll the heel of your hand into the center of the ball, fold it in half, turn 90 degrees, and repeat. Once you have kneaded all 3 balls, either leave them in a round shape, or form/roll/stretch them into a baguette-like shape. Cover again, and let rest 30 minutes.


Baking:
Preheat your oven to 450 Farenheit (or 230 Celsius) with the baking pan inside, and the 1" deep pan below your baking pan on the lowest rack.
Score (slash) the tops of your bread balls/loaves a few times with a very sharp knife. If it is too stretchy and doesn't want to be scored, then use scissors and take a few shallow snips right in the middle. That's what I did for my first try, and it worked like a charm.

Get some hot water ready - about 3/4 cup. Once the oven is preheated, sprinkle a little flour onto the preheated pan (don't remove it from the oven, though! It will cool off too quickly) and plop your little dough balls onto it. Pour the hot water into the pan in the bottom of the oven, and quickly shut the door to trap the steam. This steam is what creates a really nice crust.
Bake for 25 minutes.

Remove from the oven, and let cool on a baking rack.
Tadaaaaa! I'm so proud of myself that I want to shout it from the rooftops. This recipe made 3 baguette-shaped loaves, but only two survived to be photographed shortly after their removal from the oven. My taste-testers clearly approved, and I ended up baking a whole big round loaf later that evening (which follows the exact same recipe, except doesn't divide the dough before kneading). 


So, give it a try!  If I can do it, anyone can. 

Friday, September 5, 2014

Living Abroad Life Hack: Pumpkin Spice Coffee


Necessity is the mother of invention. I always took the season of "pumpkin spiced everything" for granted, until now. Apparently, it's a strictly American obsession, and I was on the verge of suffering withdrawal. Something had to be done, and quick.

I searched Pinterest diligently, but all Pumpkin Spice Latte recipes I found required one of two things: pumpkin puree (which I can't find in stores here), and pumpkin pie spice (again, doesn't really exist on this side of the Atlantic). In an act of sheer desperation, I concocted this little spiced coffee to hold me over until Amazon can fulfill my imported pumpkin-obsessed needs.

Pumpkin Spice Coffee

Ingredients:
Coffee (Instant or Brewed, 8 oz)
Milk (or non-dairy milk or creamer)
Ground Nutmeg
Ground Cinnamon
Ground Ginger
Raw Sugar (optional)


Add a dash of nutmeg (literally, one little dash), two dashes of cinnamon (sorry for the super precise measurements), and a dash of ground ginger to bottom of coffee cup. Add 1 tsp raw sugar (optional), and milk (again, optional) and stir. Add coffee, instant or brewed, and enjoy! It's that simple, and it definitely evokes those feelings of fall in a pinch. If you have McCormick pumpkin pie spice sitting around in your pantry, and you never use it except that once-a-year pie, then take a shortcut and toss that in instead of the individual spices! It's quick, easy, and does a lot less caloric damage than a commercial latte.


Enjoy!

Thursday, July 24, 2014

Moving Meals!

Well, it's no secret: in less than a week... we will officially have moved to England! Consequently, most of our apartment is being put in boxes, and our kitchen is growing emptier by the day. I'm determined to use up as much of the contents of our fridge/freezer/pantry as humanly possible before we depart, and so I bring you the "Moving Meals" series. These recipes are quick, cheap, require minimal ingredients, and are perfect for those ramen-noodle-budget times. Today's lunch: Cheap Chicken Chow Mein!


Ingredients: 
Ramen noodles, or rice noodles (whichever you have or prefer, one serving)
Broccoli: one box frozen, or one small head, fresh
1 bell pepper (optional)
1/2 of one yellow (or red) onion
2-3 cloves garlic, minced
1 chicken breast, diced (or 1 can of cooked chicken breast meat)
Soy Sauce
Black bean garlic sauce (or hoisin sauce + rice vinegar)
Water
Corn starch (optional, it just helps the sauce to thicken & look nicer, but doesn't effect taste)

Saute all of the vegetables with olive oil or sesame oil in a lidded pan while the water for the ramen (or rice) noodles comes to a boil.
Combine 1 tbsp black bean sauce with 3/4 cup water and 1/2 tbsp cornstarch and set aside
(Alternative: combine 1/2 tbsp hoisin, 1 tsp rice vinegar, and 1 clove finely minced garlic with cornstarch)
Add 1/2 of the sauce/water mixture to the vegetables, and cover while continuing to cook on medium low heat.
Add cooked noodles to vegetables (after straining, obviously) and add the rest of the sauce, too.
Cover with a lid, toss a little, and cook on low/medium low for another 1-3  minutes.
Garnish with... whatever! Herbs, lime, radish, etc - use up all the fresh bits in the fridge, and dig in!


If you try this recipe, comment below and let me know what you think!

Tuesday, July 30, 2013

Rosy Cosy Rosewater


If you follow me on instagram, you'll know that I spoiled myself last week by bringing home 2 dozen roses for absolutely no reason. Sometimes, a smile is reason enough. 

Well, after a few days, a couple of my roses began to wilt. I didn't want my beauties to go to waste, so I decided to make some rosewater using 6-8 of the roses. Rosewater has so many properties and uses. It contains the essential rose oils, as well as being a light and refreshing floral scent. Supposedly, Cleopatra bathed in rosewater to seduce her lover Anthony. It is also a lovely facial astringent, which is mainly what I use it for . You can use any type of roses, but I prefer something pink or red, because it gives the rosewater a really pretty pink hue.


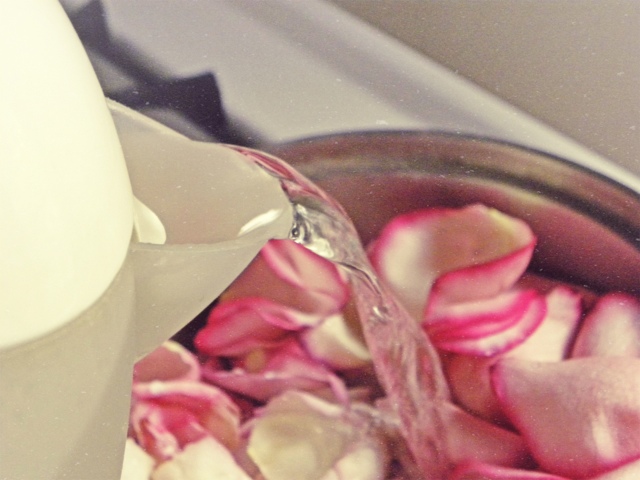
I began by filling a pot (or you can use a bowl with a tight lid) with rose petals. 


Handy dandy electric kettle to the rescue! I poured boiling water over the petals until the water barely reached the top layer of the petals.


The lid on tight, I left the petals to steam and steep until the water had cooled. This took several hours.... so I got some much-needed laundry time in. 


Strain and bottle your magic potion! Voila!

Tuesday, July 23, 2013

Treasures


When I was a young Girl Scout I heard the phrase, "take nothing but pictures; leave nothing but footprints". 

Well, I still have carry the picture-taking part with me, but I don't think it's too bad to have snatched up a few pretty shells from the beach. 

These are just a few of the treasures I brought home with me from this past weekend (seaweed excluded) and I really want to think of a fun crafty project use for them. 

Wednesday, July 10, 2013

Shiny Things

I love trim stores in New York. There are dozens of tiny (and large!) specialty shops full of anything you could want or imagine. Intricate beads, rainbows of feathers, a wonderland of rhinestones, and miles of ribbons down every aisle. Being a bit of a magpie myself, I can get lost wandering for hours  
I ventured out on my lunch break today to pick up a few items for a little project I've been meaning to get to lately... But you'll see more of that later this weekend :) 


Sunday, April 14, 2013

Think Pink

I always like to try to accomplish some sort of DIY project on Sundays. No matter how small, it just seems like the perfect day to spruce up my home (or anything in it).
Lately, I've been reorganizing my kitchen into repurposed jars and containers. I've employed the use of mismatched mason jars and pretty empty candle glasses.
Today, after using the last of a can of coffee, I thought I could brighten up the can with a cheerful coat of paint. Voila! Airtight storage container with a lid. (Or, sans lid, a cute vase for some fresh flowers).
In keeping with my pink theme, I pulled out a vintage pale yellow sweater I haven't worn since it acquired a stain (I have such a bad track record with light colored clothing!) and gave it a quick bath in some pink iDye. Two pink projects in one morning! Not too shabby :)


Sunday, January 27, 2013

Native Wrap

Since Taylor's ethnicity contains some obscure fraction of Native American, I attempted this fun, colorful, modern adaptation of a traditional hairstyle.

It basically started by braiding one long braid down her back, then wrapping in turquoise yarn and looping it through the braid occasionally to hold it in place. It was super cute and went perfectly with her outfit today!!

If you're by yourself and want to do it to your own hair, try pigtail braids so it's easier to reach. You don't have to limit yourself to one color, either. Stripes would be awesome - might have to give those a shot next time around.


Sunday, January 20, 2013

DIY Vintage Fabric Coasters

Here's an easy Sunday morning DIY that literally takes 5 minutes.

I had a yard of vintage upholstery canvas with a pretty, 50's floral print on it.
Heavy upholstery and canvas fabrics work best, especially ones with prints, because they're going to be less likely to fray. However, the fray could be cute, so use whatever you have!

I simply traced a 3 1/2" square onto the back of the fabric in pencil, then cut out the squares. Instant coasters!
(Have more fabric? This would make cute matching placemats, too!)

Enjoy :)