Showing posts with label homemade. Show all posts

Wednesday, December 17, 2014

What's Cooking: Easy Homemade Pasta

This recipe is from my food blog, Street Cred. Click on the photo below to check it out!


BUM-BUM-BUM! I know that this might sound intimidating, but please trust me, it's not. If you can roll out sugar cookies, you can make pasta. No lie! When I started making my own pasta about a year ago, I didn't even own a rolling pin - I used an empty wine bottle to roll out my dough. And it worked great! So there is no need for a fancy pasta machine, and in about half an hour you can have amazing fresh handmade pasta.

do have the advantage of owning a pasta machine now, since it was an anniversary gift this year (and a hint that the hubs wants me to make pasta more often). If you make pasta using this recipe and you decide that it's worth the time, effort, and you like to know exactly what's in your food - you can pick up a basic hand crank model like mine for about 20 bucks (or pounds, or whatever your unit of currency is). It still won't save you from the upper body workout that is kneading dough, but hey! The more calories you burn, the more of that fantastic pasta you can eat later.

So, without further adieu, here are the ingredients for my pasta recipe:

2 1/4 cups all-purpose flour (plus a little more for dusting)
3 large eggs


That's it! I swear! That's all that goes into pasta. Or, should I say, it should be. This stuff can be hang dried or refrigerated for up to a week, so even if you don't use this whole batch at once, it won't go to waste. Typically this makes 6-8 servings, depending on your appetite. I made lasagna noodles this time around, and about 1/3 of the dough was leftover and cut into fettucini for the later this week. 


Make sure your work surface is washed clean and dried thoroughly. You can use a large cutting board, but I prefer a nonporous surface like a countertop. Place your flour in a pile, then hollow out the center to create a well. Crack all 3 eggs into the center well of your flour, and whisk gently with a fork (if you'd prefer, you can whisk before pouring into your flour). While stirring with the fork, gradually incorporate flour from the center edges of the well. 


When the flour is about 2/3 incorporated, you can begin mixing with your hand until a ball of dough has formed. This dough will probably be flaking off and quite messy now, and that's when the fun of kneading begins! Knead the dough ball using the heel of your hand. Flatten, fold over, and repeat. Continue this for about 8-10 minutes, until the dough is smooth and stops cracking when kneaded. It's extremely important to knead the dough, since this process gives the pasta its elasticity. 


When your dough ball is ready to be rolled out, clean and dry your work surface, and dust it with a layer of flour. Divide the ball of dough into 3-4 even pieces, and work with one at a time. Dust the top of the dough and your rolling pin (or rolling wine bottle) with flour, and begin rolling! If you're using a pasta machine, you can probably begin rolling in the machine once you have the dough at about 3/8" thickness. If you are rolling by hand, skip the rest of this paragraph and see below!
For machine rolling, start on the lowest (biggest) setting, #1, and each time the dough is rolled through, increase the number by 1. I like my lasagna noodles to be a #6 thickness, and my linguine to be a #7. Unless you're making angel hair pasta, I don't think it's really necessary to roll anything out to the thinnest setting, but that's a personal preference. I like a little substance to my pasta. Then you can either use one of the cutting wheels on your pasta machine, or remove your pasta and cut it by hand (instructions below).

For hand rolling dough, roll into a large flat sheet of desired thickness - about 1/8" is usually good. Dust the top of the pasta sheet well with flour, then fold over in half. Repeat until you have a log shaped roll of pasta. Then, using a sharp knife that is lightly dusted in flour, simply slice your log into the desired thickness. Here's a good little demo video, in case you'd like a visual for this process. Shake out your cut pasta so that it doesnt stick together, and dust with another tbsp or so of flour if you're not planning to cook it right away. 


Simply repeat this process (whether by hand or machine) for the rest of the remaining dough, and voila! The first time I made this, I think it took about 20 minutes, so please don't be intimidated - give it a try! You'll never want to buy store-bought pasta again.


Friday, September 12, 2014

Adventures in: Bread Making


This post comes from my food blog, Street Cred!

I am not a baker; I absolutely hate math and all things to do with precise measurement. Most of my cooking style, and my recipes, involve a list of ingredients without quantities or instructions. Why? Because I just sort of "wing it"; nothing is ever the same twice (except my tomato sauce, but that's a closely guarded secret). I think it's important to cook based on taste, because ingredients can vary in freshness, intensity, and often need to be adjusted to perfect the overall balance. But with that rant aside, I'll get back to my story about bread, and how I actually followed a recipe for once.

Nothing quite excites me like a good rustic crusty loaf of REAL bread. My eyes light up in an Italian restaurant every time a basket full of hot-out-of-the-oven goodness plops down on the table in front of me. When I don't feel like cooking, I'll pick up a fresh baguette on the way home and just dip it in some good olive oil, or spread some nice soft bleu cheese on it while it's warm. Ah, the wonders of good bread.

I've seen countless recipes of the "no-knead Dutch oven" variety floating around the internets lately, but upon further investigation, these look like they come out resembling a dense white bread, which is not what I am looking for. No, I want hard-crusted oblong and round loaves with a fluffy, bubbly interior. And I want to make it myself.

So, without further delay, I present to you my first attempt at homemade crusty bread. And I double-pinkie-promise that it's easy and idiot-proof. I mean, I baked something. That's proof enough.

You will need: 
Patience (Start to finish, this recipe takes about 4 hours)
3 1/2 cups bread flour (may be labeled as "strong flour") + extra for kneading/dusting
1 tsp dry instant yeast
2 tsp fine sea salt
1 1/4 - 1 1/2 cups warm water (Tap water is fine, it should be "bath water" temperature. Not too hot!)
1 baking sheet OR pizza stone
1 metal or glass pan with 1" sides
1 large mixing bowl
Your hands


The Dough:
Mix the flour, dry yeast, and salt in a bowl.
Slowly add the warm water, stirring constantly (I used a regular spoon to mix, but this can also be done in a stand mixer with a bread hook. I have none, so I did it the old fashioned way.)
When the dough is "sticky" (should look like the photo above), stop adding water, dust the top with flour, cover with a tea towel and let sit.

Let it rise for two hours. Leave it alone. Go do something else.


Dividing the Dough:
Divide the gooey dough into 3 balls. To do this, dust some flour on your countertop or wooden cutting/baking board, and roll the balls in it so that they're less sticky. Cover again, and let rest for 15 minutes.


Kneading the Dough:
A lot of people think that this is the hardest stage. Well, it's not. This isn't pasta, so the kneading part isn't the most difficult. Actually, the difficult part is done (for me, that was the waiting).
Take each ball and knead 5-8 times. Basically, roll the heel of your hand into the center of the ball, fold it in half, turn 90 degrees, and repeat. Once you have kneaded all 3 balls, either leave them in a round shape, or form/roll/stretch them into a baguette-like shape. Cover again, and let rest 30 minutes.


Baking:
Preheat your oven to 450 Farenheit (or 230 Celsius) with the baking pan inside, and the 1" deep pan below your baking pan on the lowest rack.
Score (slash) the tops of your bread balls/loaves a few times with a very sharp knife. If it is too stretchy and doesn't want to be scored, then use scissors and take a few shallow snips right in the middle. That's what I did for my first try, and it worked like a charm.

Get some hot water ready - about 3/4 cup. Once the oven is preheated, sprinkle a little flour onto the preheated pan (don't remove it from the oven, though! It will cool off too quickly) and plop your little dough balls onto it. Pour the hot water into the pan in the bottom of the oven, and quickly shut the door to trap the steam. This steam is what creates a really nice crust.
Bake for 25 minutes.

Remove from the oven, and let cool on a baking rack.
Tadaaaaa! I'm so proud of myself that I want to shout it from the rooftops. This recipe made 3 baguette-shaped loaves, but only two survived to be photographed shortly after their removal from the oven. My taste-testers clearly approved, and I ended up baking a whole big round loaf later that evening (which follows the exact same recipe, except doesn't divide the dough before kneading). 


So, give it a try!  If I can do it, anyone can. 

Friday, May 30, 2014

Iced Over


So, as some of my instagram followers may or may not know, I was surprised with the wedding gift to end all wedding gifts: a Cuisinart ice cream maker. And guess what??? It arrived early, and I'm taking it home with me for the weekend. Pinterest has been providing an overwhelming amount of flavor inspiration, and I just can't decide what to make first! (I think I'm going to need to buy a second freezer.) Any suggestions? Anyone want to be my official taste tester? :)


Sunday, March 2, 2014

Instant Instagram


I've been really busy this week (and will be next week as well), so blog posts aren't happening as frequently as I'd ideally like them to.
You can still keep up with all of my goings on on Instagram, though! Follow me @disownedclothing - I promise to be entertaining...
Almost as entertaining as my first attempt at editing my blog layout with html. Enjoy the weird photos and obsessive food documentation. 

Wednesday, November 13, 2013

That Warm Fuzzy Feeling

It's the time of year when cold nights and mornings, snow flurries, and blustery winds begin to penetrate through layers of clothing and leave us all a little chilled. What better way to spend an evening curled up on the couch, than with a warm spiced drink that can also keep those seasonal sniffles away? Here's a recipe for my favorite home sniffles remedy drink, and it's darn yummy too.
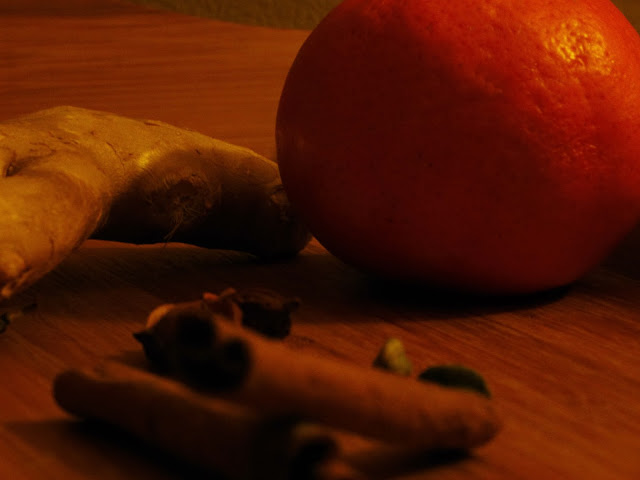
It begins with some spices: cinnamon, anise, and cardamom (optional - I added it to the recipe because I love it). Cinnamon is a natural anti-inflammatory and anti-microbial, and anise and cardamom aids in digestion and stomach issues.
Next, ginger. Ginger is my favorite natural year-round health boosting addition. Pop a chunk in a cup of tea, or finely chop and add to stir fry or soup for a delicious zing with countless benefits. Ginger aids in detox, is anti-inflammatory and anti-microbial, and can calm an upset stomach. (Ever wonder why your mom gave you ginger ale when you had a stomach bug? Because there's actually ginger in it, and ginger is good for your stomach)

Finally, fruits. Oranges (I used tangerines, because they happened to look particularly delicious today), lemons, and pear add natural sweetness and immune boosting vitamins, as well as essential oils from their peels. The full recipe is below, but basically you bring everything to a boil, then cover and let steep, and drink warm or cold. Or, if you'd like to keep a batch ready for the next day, put everything in the slow cooker the night before. Tadaaa!!! Hope you stay all warm and toasty this winter.

Sniffles Stopper Spiced Drink
2" ginger root, peeled & cut into several pieces
2 cinnamon sticks
1 star anise
1-3 green cardamom pods (optional)
2 slices orange, with rind
1 sliver of lemon peel
2 slices of pear
4 cups water

-Add all ingredients to a small saucepot & bring to a boil
-Cover & let sit until warm (drinking temperature). 
-Enjoy!

PS- As mentioned above, this drink can be made in a slow cooker (crock pot) and stay warm for you all day. I recommend doubling the recipe listed above and preparing the night before if you choose to cook it this way.

Tuesday, July 30, 2013

Rosy Cosy Rosewater


If you follow me on instagram, you'll know that I spoiled myself last week by bringing home 2 dozen roses for absolutely no reason. Sometimes, a smile is reason enough. 

Well, after a few days, a couple of my roses began to wilt. I didn't want my beauties to go to waste, so I decided to make some rosewater using 6-8 of the roses. Rosewater has so many properties and uses. It contains the essential rose oils, as well as being a light and refreshing floral scent. Supposedly, Cleopatra bathed in rosewater to seduce her lover Anthony. It is also a lovely facial astringent, which is mainly what I use it for . You can use any type of roses, but I prefer something pink or red, because it gives the rosewater a really pretty pink hue.


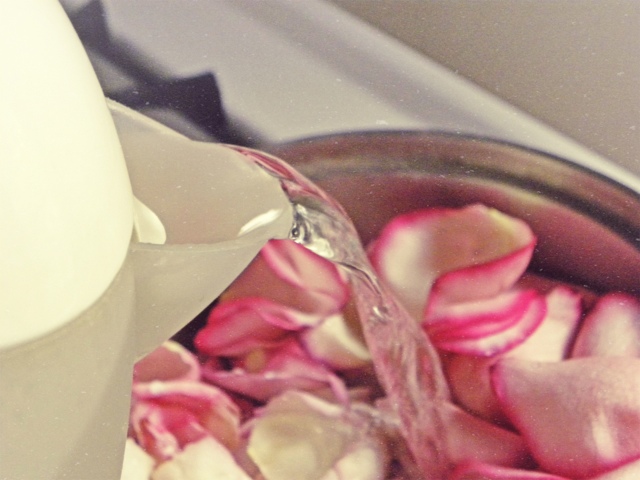
I began by filling a pot (or you can use a bowl with a tight lid) with rose petals. 


Handy dandy electric kettle to the rescue! I poured boiling water over the petals until the water barely reached the top layer of the petals.


The lid on tight, I left the petals to steam and steep until the water had cooled. This took several hours.... so I got some much-needed laundry time in. 


Strain and bottle your magic potion! Voila!

Monday, July 1, 2013

Need A Granita?

So.... This is pretty much the simplest dessert you can imagine, and is the perfect refreshing, healthy alternative to ice cream and other summer treats. The best part? 4 ingredients, and it basically makes itself. No special equipment necessary! 

PINEAPPLE, CITRUS, AND BASIL GRANITA

Ingredients:
1 1/2 cups cubed fresh pineapple
Juice of 1/2 a lemon 
1/2 tsp lemon zest
4-5 basil leaves

-Chiffonade basil
-Add all ingredients to blender
-Increase speed in increments until all ingredients are well blended 
-Strain liquid from blender into flat baking dish, not exceeding 12" in diameter
-Place dish in freezer
-Stir, break up, and mash mixture with a fork every 30-40 minutes until it is completely crystallized and can be fluffed with a fork 
-Transfer to lidded storage container, or serve immediately and enjoy! 

Happy summer:) 


Sunday, June 23, 2013

Got the Blues(berries)

I love cooking from scratch, and I try to avoid buying processed and packaged foods as much as possible. So, with blueberries in season, these homemade gluten free pancakes were a totally necessary treat.


Monday, December 3, 2012

Home Cookin'

Found a great butcher shop in Williamsburg this weekend and went on a Polish eating spree.

The smell of freshly smoked meat, rings of kielbasa hanging from the ceiling, homemade stuffed cabbage... Felt like being back in my grandmother's kitchen. Only meatier. I may have eaten an entire ring of kielbasa in one sitting. Hey, don't judge, it was my birthday.

Used some leftover Canadian bacon today with roasted butternut squash, and Parmesan to make a great leftover hash. Finish it with a little fresh parsley for a great winter one-dish meal.

Back to a busy week! Time to start the holiday shopping! Can't believe it's December already.


Wednesday, November 21, 2012

A Stitch In Time

I've found that adding small personal touches can make a simple object truly memorable.

From embroidering some spare fabric to make a little throw pillow....

To patching a quilt with some chunky contrast embroidery thread.

Also, mending things by hand gives me a very 18th century vibe. I feel like I should be sewing by candlelight... Is that normal? I'm quite ok if it's not.

Put your own stitch on something you love.